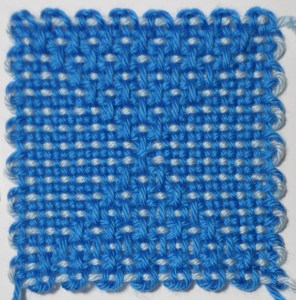
Three variations of 4-inch woven hearts.

Three variations of 4-inch woven hearts.

The pattern for the bas relief (raised) pink heart in the photo above comes from the book Pin Loom Weaving by Margaret Stump so I haven’t included it herein.
http://smile.amazon.com/Pin-Loom-Weaving-Projects-Looms/dp/0811712486/ref=sr_1_1?ie=UTF8&qid=1436039003&sr=8-1&keywords=margaret+stump&pebp=1436039007602&perid=0R60NY9YBQC6N9C2MT4E

The jumping off place for all those interested in pin loom weaving.

The jumping off place for all those interested in pin loom weaving.

But I invented the pattern for the sunken heart depicted in the other squares, so I’m sharing it here.

The method I use is: Warp the first three layers in one color, then switch to a second color for the last layer. I wrap an extra five wraps around the loom–9 3/4 wraps total–and either tie on at the end of the long strand and weave pulling the extra long length through, or tie on after the 5 wraps. When finished I either crochet the border from corner four or two. Weaving the entire length puts the crochet tail at corner four. It doesn’t matter which way you choose; it just depends on where you want your final knot or whether or not you mind pulling an extra long weaving length through your work.

Please keep in mind these instructions are the intellectual property of Sue Burton. Do not copy or sell them. You may share the link to this blog.

Row 1: Plain weave (P)
Row 2: U-3, O-1 across; end with U-3
Row 3: P-2; U-3, O-1 (2x); U-3; P-5; U-3, O-1 (2x); U-3; P-2
Row 4: U-3, O-1 (2x); U-3; P-9; U-3, O-1 (2x); U-3
Row 5: P2; U-3, O-1, U-3; P-13; U-3, O-1, U-3; P-2
Row 6: U-3, O-1, U-3; P-17; U-3, O-1, U-3
Row 7: P-2; U-3; P-21; U-3; P-2
Row 8: U-3; P-25; U-3
Row 9: P
Row 10: Repeat row 8 [Or see Variation instructions below]
Row 11: P
Row 12: Repeat row 8
Row 13: P-2; U-3; P-9; U-3; P-9; U-3; P-2
Row 14: U-3, O-1, U-3; P-5; U-3, O-1, U-3; P-5; U-3, O-1, U-3
Row 15: P-2; U-3, O-1 across; end with U-3; P-2
Row 16: P

Variation for Row 10: P
[This will produce the effect in the pink/blue heart shown in the photo.]

As you can see in the photos below, the effect of the raised heart on its reverse side is different while the sunken heart itself looks the same on both sides.

Reverse of Margaret Stump's heart pattern.

Reverse of Margaret Stump’s heart pattern.

Reverse of Sunken Heart pattern.

Reverse of Sunken Heart pattern.


The heart is less obvious in this two-color version. Layers 1 and three in green; layers 2 and 4 in pink.

Sunken heart.

Sunken heart.

The hands have not been idle.

"Hourglass," Weave-it Weaves, p 11.

“Hourglass,” Weave-it Weaves, p 11.

I made this pretty square and followed the instructions to the T. (To the T? Did I make that up? I don’t think so . . .) But I’m not wholly satisfied with that extra long stitch in the middle. (However, if you like the idea of that long stitch being the sand that runs through the hourglass, you might not want to change it.) I know exactly why it’s there though.

And I figured out how to fix it.

"Hourglass (modified)."

“Hourglass (modified).”

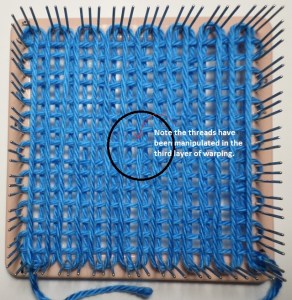
You have to get tricky during the warping process.

First, go to eloomanation.com and download, or open, the Weave-it Weaves PDF.

http://www.eloomanation.com/pdf/1938WeaveItWeaves.pdf

Print it and write this on page 11: Hourglass modified—Warp layers 1-3 as usual. If cutting after layer 3, unwind back to strand 16 (total number of vertical strands from layers 1 and 3) and thread under horizontal strand #8. Tie on next color and continue. If cutting after winding (4 3/4 times), go back then and thread under strand #8.

Then follow the directions for weaving as printed in the manual.

***Click on photo to see larger version. Click on back arrow to return to these instructions.

Photo shows how layer 3 has been modified.

Photo shows how layer 3 has been modified.

Please note that because layer 1 was not altered, the two squares look the same on the back.

The reverse sides are identical.

The reverse sides are identical.

Coming soon: a Sue Burton original, the Sunken Heart pattern stitch . . .

Sunken Heart

Sunken Heart

Sunken Heart

Sunken Heart with finished edge.

How to join pin loom squares together is a puzzle that plagues us all. This post is an attempt to ameliorate the struggle.

As Count Rugen said, “Remember, this is for posterity so be honest.” I would amend that statement to “be thorough.” To be honest, I’ve been as thorough as I can stand (up to now). So if this tutorial isn’t something future, as well as present, generations can use, at least it’s helpful to me. I’ve assembled what I’ve learned by experience. If it helps someone else, great. There are many useful sites Out There, so this one may not be the last word in how to join those little squares we’re all getting so fond of making. Read More →