2014: September, October, November . . . Frequent visits to Amazon kept bringing up a particular product–Margaret Stump’s book, Pin Loom Weaving.

http://smile.amazon.com/Pin-Loom-Weaving-Projects-Looms/dp/0811712486/ref=sr_1_1?ie=UTF8&qid=1453402445&sr=8-1&keywords=pin+loom+weaving

Pin Loom Weaving by Margaret Stump

Pin Loom Weaving by Margaret Stump

Who’d ever heard of pin loom weaving? But that folk art horse on the cover captured my interest over and over. And I don’t even like horses. I mean, I like ’em all right, but I wasn’t a horse-mad child. To tell the truth, I never once noticed the square thing at the bottom of the photo.

“You buy too many art books because of the cover,” I told myself. “Too many. Just say no to this one.”

Week after week: “Just say no.” “Walk away.” “I promise if you swim back now, no harm will come to you.”

Read More →

"3-and-1" front view

Abbreviations:

P = plain weave
U = under
O = over

Warp loom as follows:

Layers 1 and 2: use color 1 (sample shows Caron Simply Soft “Lavender Blue”)

At corner 3 change to color 2 (sample shows Caron Simply Soft “Soft Pink”); warp Layer 3, finishing at corner 2. Wrap yarn five times around loom, cut, thread needle.

Instructions:

R1 and R16: P
Even Rows: P2, (U3, O1) x 6, U3 , P2
Odd Rows: P4, (U3, O1) x 5, U3, P4

3-and-1

"3-and-1"--back view

back view

UPDATE 11-11-16

This pattern works well on the 2″, 4″, and 6″ squares and rectangles.

3-and-1 (modified) on 6" square loom

3-and-1 on 6″ square loom

3-and-1 (modified) on 4" x 6" rectangular loom

3-and-1 on 4″ x 6″ rectangular loom

**********************************************

10 Aug 2018 UPDATE: the pattern below was originally posted as “3-and-1,” but did not go with the photo. It’s also a legitimate pattern.

Rows 1 and 16: P
Rows 2-15: U-1, O-3 seven times; end with P-3

3-and-1 reverse

Three variations of 4-inch woven hearts.

Three variations of 4-inch woven hearts.

The pattern for the bas relief (raised) pink heart in the photo above comes from the book Pin Loom Weaving by Margaret Stump so I haven’t included it herein.
http://smile.amazon.com/Pin-Loom-Weaving-Projects-Looms/dp/0811712486/ref=sr_1_1?ie=UTF8&qid=1436039003&sr=8-1&keywords=margaret+stump&pebp=1436039007602&perid=0R60NY9YBQC6N9C2MT4E

The jumping off place for all those interested in pin loom weaving.

The jumping off place for all those interested in pin loom weaving.

But I invented the pattern for the sunken heart depicted in the other squares, so I’m sharing it here.

The method I use is: Warp the first three layers in one color, then switch to a second color for the last layer. I wrap an extra five wraps around the loom–9 3/4 wraps total–and either tie on at the end of the long strand and weave pulling the extra long length through, or tie on after the 5 wraps. When finished I either crochet the border from corner four or two. Weaving the entire length puts the crochet tail at corner four. It doesn’t matter which way you choose; it just depends on where you want your final knot or whether or not you mind pulling an extra long weaving length through your work.

Please keep in mind these instructions are the intellectual property of Sue Burton. Do not copy or sell them. You may share the link to this blog.

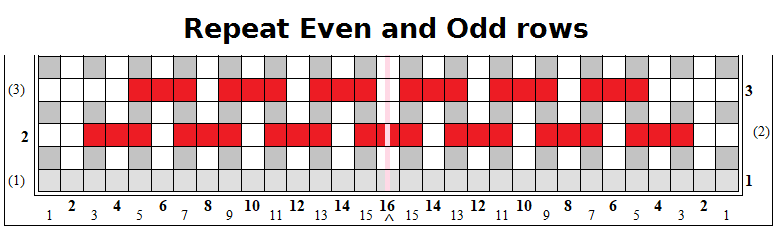
Row 1: Plain weave (P)
Row 2: U-3, O-1 across; end with U-3
Row 3: P-2; U-3, O-1 (2x); U-3; P-5; U-3, O-1 (2x); U-3; P-2
Row 4: U-3, O-1 (2x); U-3; P-9; U-3, O-1 (2x); U-3
Row 5: P2; U-3, O-1, U-3; P-13; U-3, O-1, U-3; P-2
Row 6: U-3, O-1, U-3; P-17; U-3, O-1, U-3
Row 7: P-2; U-3; P-21; U-3; P-2
Row 8: U-3; P-25; U-3
Row 9: P
Row 10: Repeat row 8 [Or see Variation instructions below]
Row 11: P
Row 12: Repeat row 8
Row 13: P-2; U-3; P-9; U-3; P-9; U-3; P-2
Row 14: U-3, O-1, U-3; P-5; U-3, O-1, U-3; P-5; U-3, O-1, U-3
Row 15: P-2; U-3, O-1 across; end with U-3; P-2
Row 16: P

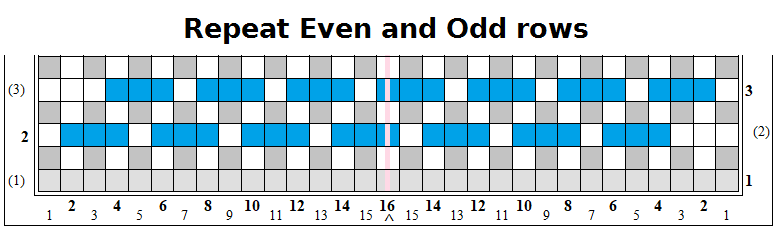
Variation for Row 10: P
[This will produce the effect in the pink/blue heart shown in the photo.]

As you can see in the photos below, the effect of the raised heart on its reverse side is different while the sunken heart itself looks the same on both sides.

Reverse of Margaret Stump's heart pattern.

Reverse of Margaret Stump’s heart pattern.

Reverse of Sunken Heart pattern.

Reverse of Sunken Heart pattern.


The heart is less obvious in this two-color version. Layers 1 and three in green; layers 2 and 4 in pink.

Sunken heart.

Sunken heart.

The hands have not been idle.

"Hourglass," Weave-it Weaves, p 11.

“Hourglass,” Weave-it Weaves, p 11.

I made this pretty square and followed the instructions to the T. (To the T? Did I make that up? I don’t think so . . .) But I’m not wholly satisfied with that extra long stitch in the middle. (However, if you like the idea of that long stitch being the sand that runs through the hourglass, you might not want to change it.) I know exactly why it’s there though.

And I figured out how to fix it.

"Hourglass (modified)."

“Hourglass (modified).”

You have to get tricky during the warping process.

First, go to eloomanation.com and download, or open, the Weave-it Weaves PDF.

http://www.eloomanation.com/pdf/1938WeaveItWeaves.pdf

Print it and write this on page 11: Hourglass modified—Warp layers 1-3 as usual. If cutting after layer 3, unwind back to strand 16 (total number of vertical strands from layers 1 and 3) and thread under horizontal strand #8. Tie on next color and continue. If cutting after winding (4 3/4 times), go back then and thread under strand #8.

Then follow the directions for weaving as printed in the manual.

***Click on photo to see larger version. Click on back arrow to return to these instructions.

Photo shows how layer 3 has been modified.

Photo shows how layer 3 has been modified.

Please note that because layer 1 was not altered, the two squares look the same on the back.

The reverse sides are identical.

The reverse sides are identical.

Coming soon: a Sue Burton original, the Sunken Heart pattern stitch . . .

Sunken Heart

Sunken Heart

Sunken Heart

Sunken Heart with finished edge.