Much as I love dyeing and bead-Weave-it-ing, duty occasionally calls and I find myself back at the designing board. Tonight’s excursion was a variation on a theme, specifically the “Loomette Weave 14” theme. Read More →
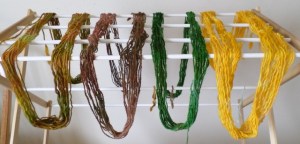
I realize that pictures of freshly dyed yarn drying on a rack can lose their appeal after a while, or awhile (long time/short time). Yet the thrill of doing the dyeing does not die. How many times have I dyed now? I feel like Phil in Groundhog Day.
The two hanks of yarn on the outside edges were once what we call white in the wool world, though off-white, or natural, is more accurate. In the past several days, I’ve woven up the other yarns I dyed and noticed I was lacking a yellow representative, so I MADE MY OWN! (Yeah, yeah, I made all the others too, but it still thrills me that I can make what I need right here at home.)
The two skeins in the center of the drying rack photo were gray–hand spun by yours truly. That emerald green is not my usual fare–I have to make mistakes to get out of my comfort zone–it was meant, ahem, to be blue. So, great news, I still have some dyeing ahead of me. And, to get the colors I want, I’ll either have to buy more Wilton cake decorating gel dyes or actually mix up the Pro Chem stuff I bought last year. (Which do you think is going to happen first?) In the meantime I’m spinning up my undyed merino wool so I can truly own this project!
In other news, I wove a Fourth of July tree with beads (and yarn). It’s a toss-up between weaving with beads and dyeing–which I enjoy more. Luckily, I don’t have to choose. I can do them both!
If you’re not a member of the Pin Loom Weaving Support Group on Facebook and you are a pin loom weaver, you might want to join up just to see what’s going on.
What’s been going on lately, among other topics, is a discussion of overshot weaving. I still don’t have a clear, concise definition, but ignorance hasn’t stopped me from attempting these patterns posted and freely shared with the group. Thanks to Amber Vigil and Judie Eatough for sharing their work with us!
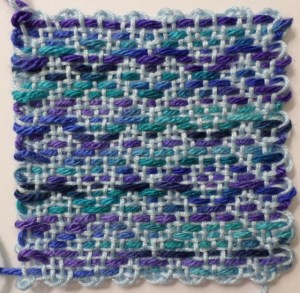
I fell in love with Amber’s Overshot Diamonds pattern and have tried it out in a couple of color combinations.
Here are the instructions for Amber Vigil’s Overshot Diamonds (included here with Amber’s permission):
Step 1: Weave an entire plainweave square to form the “background”
Step 2: Weave the overshot pattern between each of the “background” rows. The overshot rows are variations of (u2, o1, u2, o3) or (o2, u1, o2, u3) with the repeat starting in different places within the row. While weaving, I would look at how the row started and then say 2-1-2-3 to myself as I wove over & under.
Row 1: u1; (o2, u1, o2, u3) x3; o2, u1, o2, u1
Row 2: u2; (o3, u2, o1, u2) x3; o3, u2
Row 3: repeat Row 1
Row 4: (o2, u3, o2, u1) x3; o2, u3, o2
Row 5: u3; (o1, u2, o3, u2) x3; o1, u3
Row 6: repeat Row 4
Repeat rows 1-6 until the end.
*******************************
Judie posted a cute pattern with hearts and diamonds, so I tried it out too. I wanted to try new colors, but I think I’d prefer the hearts in red . . . next time.
Judie’s graph can be found at: Handweaving.net
With her permission, I’m posting the instructions I typed out here. They’re slightly different from her graph.
Judie Eatough: Hearts for the Pin Loom
Create a “mesh canvas” by weaving layers 1-4 with thin yarn (MC). Then go back and reweave layers 2 and 4 with a thicker, HIGH CONTRAST (CC) yarn between the existing rows. (Use 8 1/2 wraps of yarn around the pins.)
Row 1: O1, U1, O4, U2, O1, U2, O4, U1, O4, U2, O1, U2, O4, U1, O1
Row 2: U3, (O2, U2, P3, U2, O2, U3) x 2
Row 3: U1, O1, U4, O2, U1, O2, U4, O1, U4, O2, U1, O2, U4, O1, U1
Row 4: O3, (U2, O2, P3, O2, U2, O3) x 2
Row 5: O1, (U1, O2, U2, O2) x 4, U1, O1
Row 6: Rpt R2
Row 7: U1, (O1, U2, O2, U2) x 4, O1, U1
Row 8: O3, (U2, O2, U3, O2, U2, O3) x 2
Repeat R1-8 three times, then R1-6 once more, for a total of 30 rows. (You can weave Row 7 one more time [for a total of 31 rows] to complete the point at the top of the last section of diamonds, but this will give you a loose, unfinished-looking edge at the top of your work. I recommend keeping the overshot weaving to a total of 30 rows between the rows of underweaving.) (I suppose you could plain weave that 31st row with the CC. I still think I prefer the overshot threads encased by the mesh threads.)
Both Amber’s and Judie’s patterns can be downloaded from the Facebook Pin Loom Weaving Support Group.
It’s not as if anyone was hounding me to make a video of this particular technique, but I wanted to because it will save me time describing it. I really hope it will be helpful.
Technique is shown on a Loomette loom.
The pattern is HORIZONTAL Xs, Variation 1
Row 1: Plain (P)
Even rows: P-2; U-3, P3 (4x); U-3, P-2
Odd rows: P-5; O-3, P-3 (3x); O-3, P-5
Row 16: P


