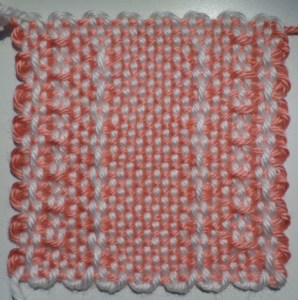
Soooooooooo

I wasn’t supposed to host the WAL this week because, as LK put it, “Our much-esteemed host will be using her well-deserved time to catch up on her excellent blog”.  I don’t say it is an excellent blog myself, but “my friends tell me . . . .” (Ha ha! Name that movie and/or character . . . *ANSWER is at the ultimate bottom of this post).

Here I am, catching up on my blog and killing four birds with one stone–LA’s request, LK’s two requests, and her-and-my idea to create a template, or checklist, for future WAL hosts/hostesses. When I say “request” I mean they made a comment and I barged in with, “I was planning to do a blog post on that . . .” And I should also mention TW, who asked me how to do this in the first place—there’s no substitute for a live student, though we do pretty well on the Support Group.

TEMPLATE (which will be summarized at the penultimate bottom of this post. Template instructions are centered in this post.)

You might want to begin with a photo of the finished square or some other relevant photo.

Include the name of the pattern. You can say something about why you chose the pattern and/or its title. You can also add other introductory comments before digging into the nitty gritty.

Pattern #24: “Lines and Os”

This square has both a number and a name because it comes from the pile of numbered squares (it’s #24 in the stack) I have in my Catalog of Squares. (That gives me an idea for another blog post or page: A Catalog of Squares.) Originally #24 didn’t have a name and, after I batted several about, it ended up with the above colorless rendition.

Left is the sample pattern. Right is the original "#24."

Left is the sample pattern. Right is the original #24.

Read More →

“Lattice Borders,” from the Weave-it Magic Squares booklet, is a simple and versatile pattern. It’s somewhere between an overall pattern and a picture pattern, and would make a great border design on a scarf or blanket. It looks great in single or several colors, but variegated yarn is not recommended as the details of the pattern will likely be lost.

"Lattice Borders"--single color; this sample featured a mistake in the pattern. It has since been corrected.

“Lattice Borders”–single color; this sample originally featured a mistake in the pattern. It has since been corrected.

When I wove the sample pictured above, I made a mistake I didn’t notice till I took the square off the loom. “Rats!” I thought, planning to start over. Instead I went on to make the already warped two-color sample of the same square. While I wove I recognized the “blessing in disguise:” I could demonstrate how to fix a mistake in a square after it’s off the loom. Watch for that mini-tutorial later in this post.

"Lattice Borders" in two colors--warped L 1&3 in mc, L2&4 in cc.

“Lattice Borders” in two colors–warped L1 & 3: mc/L2 & 4: cc.

Read More →

Someone asked me to make  a video on using beads in a heart shape for the pin loom. As much “fun” as it is to make a video, I’d rather hold off to see if it’s totally necessary. For instance, the heart pattern I made up is so similar to the Single Outline Diamond that, in a video, a lot of the information would be repetitious. Furthermore, printed instructions, a pattern, and photos would be just as, if not more, helpful–in my opinion (which bears a lot of sway with me)–than a video. And another thing–I need some outside opinions on the finished product before I make a final decision.

Let’s start with the design.

For lack of a better title, I'll it "Single Outline Heart"

For lack of a better title, I’ll call it “Single Outline Heart”

I’m getting faster at figuring these graphs out, but it’s still considerable effort. Though I have access to a computer weaving-draft whatcamajiggy, I still prefer to draw the design out by hand, erase, redesign and redraw on another section of the piece of graph paper. The photo above is the third version of the heart I designed.

Why didn’t I make the sides (Rows 8-12) a straight line? Because you can’t. The warp strands won’t be woven in if you go U-3 in the same spot in four rows. Trying to figure out in my head (and on paper) if I could manipulate the Layer 2 strands (I think they’re called picks) yielded dissatisfying results–though I may still try it just to see how the heart looks.

18 MAY 2017 UPDATE: You can make it appear as though there is a straight line on R8-12 by plain weaving on rows 8 and 10. This will yield a thinner-looking line and the absence of any pattern stitches will not be noticeable. Leaving the bead off those rows will be more noticeable, but I still think it will look better.

MATERIALS

yarn

30 beads with holes large enough to accommodate yarn (I used 6/0 Rocaille, or seed, beads) Read More →

I made the slight mistake of photoing two processes at one time, but people are anxious to begin beading their Single Outline Diamonds, so I’m using these photos for now. Live and learn–next time I’ll try not combine too much information in one project. Please don’t be confused by the different colors in the different layers. Just use all one color unless you feel ready to try combining colors and beads.

Single Outline Diamond in two colors, with beads

Single Outline Diamond in two colors, with beads

Materials

24 Rocaille, or E, or Seed (6/0) beads to complement your yarn

Yarn thin enough to thread the beads onto

A flexible beading needle or thin wire (such as the wire pulled out of the selvage of decorative ribbon)

Instructions Read More →