30 May 2016 Update: I originally learned the “Houndstooth Check” pattern from the book 100 Pin Loom Squares by Florencia Campos Correa. Loved the square, but thought her instructions were insufficient, so I wrote my own–with LOTS of photos. Today I updated the instructions to make them more clear and to make their terminology agree with words and symbols I’ve come to use consistently during the past year of my Adventures in Pin Loom Weaving.

100 Pin Loom Squares by Florencia Campos Correa. The title is misleading. There aren’t 100 different patterns and there aren’t even 100 different color combinations. Nevertheless, the book is still useful.
This photo shows some different color combinations of the houndstooth check.

I’m not going to call this four different squares, but I’ll call it four different color combinations of the houndstooth check pattern.
***REMEMBER: Click on a photo to enlarge it; click the Back arrow to return to these instructions.
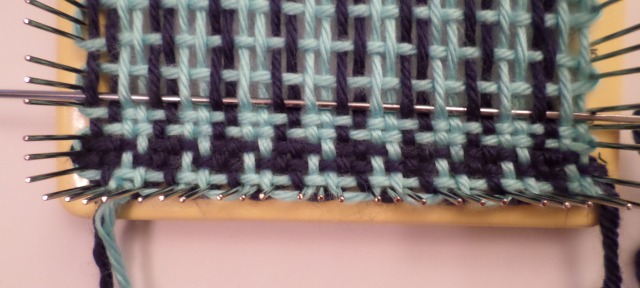
Note: I’ve corrected a mistake I’ve perpetuated in 10 houndstooth squares. Correction photo sample is shown on the Loomette pin loom (because I discovered the mistake on the 11th square I made). The “mistake” is not a critical one, but you’ll like the finished product better this way. See “Step 3–Weft-Layer 1, Color 2” below.
Materials
4-inch pin loom
6-inch weaving needle
needle threader (optional)
fork (optional) to pack the rows together (especially helpful during second weaving layer)
4 yards of color 1 and 4 yards of color 2 (It’s not necessary to measure them out ahead; you can pull them straight from the skein. But if you have scraps, they need to total at least 4 yards apiece.)
Step 1–Warping the Loom: Layer 1, Color 1
You will begin warping layer 1 (L1) at corner 1 (Cr1) of the loom.

Designation of corners and sides of loom
Leaving a tail of about 5 inches, tie a slip knot in the yarn and slide it over the second pin of the 4-pin group located at Cr1.

Tie slip knot to second pin from left on bottom edge. In the photo the knot is loose, but I like to pull it tight against the pin.
Bring the strand of yarn that’s still attached to the skein around the first pin to the left of the pin where you tied the knot. Take that strand straight up and loop (or wind) it around the first pin at the top of the loom, then straight down again and loop it around the three remaining pins in that first group of four. KEEP THE YARN LOOSE. Look at all the instruction photos to see how loose the threads should be while warping. (It’s hard to keep the shadow of the camera out of the photos, so if you can’t see clearly, check the other photos. I tried to keep the shadow moving around.)

Warp L1 with Color 1
Continue warping L1 in this manner: from the bottom, loop around 3 pins, to the top where you loop around only the first pin in the group.

Hopefully this photo gives a better look at the L1 warp.
[30 May 2016 Update: I’ve determined the step described in this paragraph is unnecessary. I’m leaving it in because the knots show in the photos. It is not necessary to tie the yarn to the loom; just leave it hanging at Cr2.] When you work your way over to Cr2, notice there are three pins in that corner spot. Loop the yarn around the three pins and then make a slip knot over the third pin, but don’t cut the yarn. (***You will be untying this knot before you begin to weave, so make sure it’s un-doable.) If you can’t work a slip knot here–because it’s kind of tricky to get it placed just right–you can just wind the yarn around the pin a few times. Don’t worry if it loosens because you can snug it up later.
You can cut the yarn now–after wrapping it 4 1/2 times around the loom–but I’ve found that leaving it attached to the skein also works. I’ve done it both ways, so it doesn’t really matter.
You now have eight groups of double strands.
Step 2–Warping the Loom: Layer 2, Color 2
Leaving a 5-inch tail, tie color 2 onto the third pin of the four pins at Cr1. Loop this strand left around that third pin and draw it up to the top row, looping it around the second pin of the two-pin top group at Cr3. Bring the yarn straight down and loop it around pin #4 of the first group and pin #1 of the second group (which has three pins). Continue warping in this manner: up around pin #3, down around pins 3&1.
To finish warp L2, bring the yarn straight down from pin #3 at Cr4 (pin #4 doesn’t get used) and sandwich it in between pins 1&2 of Cr2’s 3-pin group. It looks smooshed and it will make your first stitch tough, but this is how it’s done. (It’s sharing the space with its predecessor, so there are two threads in that last space.)
This creates a layer of 8 double strands set between the first layer of 8 double strands–a total of 32 strands.

L2 with Color 2
Here is a close-up of the beginning of L2:

A closer view.
Step 3–Weft-Layer 1 (WfL1), Color 2 [see Error Correction for R1–pink yarn photo below]
Wrap Color 2 all the way around the loom 4 1/2 times. The photo below shows the yarn cut after L1 (which you don’t need to do; but if you did, just secure the yarn in a neat little bundle to be used in the second weaving layer). I include this photo to show what it means to wrap the yarn around the loom 4 1/2 times.

4 1/2 wraps. And that’s a cut.
Cut the color 2 yarn and thread the needle. [UNTIE THE KNOT FROM L1 NOW (on the right-hand side, not the beginning left knot; those stay in till the square comes off the loom) BEFORE YOU BEGIN WEAVING!]
L1&2 warp threads will now be hanging down from Cr2. Hold them in place with your thumb as you begin to weave.
ERROR CORRECTION: In order to interlock the corner threads, take the color 2 yarn over and UNDER the color 1 yarn tail before beginning to weave L1.

Looping the yarn tails will interlock the Cr2 stitches.

This is how the Cr2 stitches look if you don’t interlock them first.
Weave: Under, Over (U, O) across. Notice the first thread looks sort of loose; it will tighten up when you pull the needle and yarn all the way through and after a couple of rows. Those first stitches are a bit tricky, but after R1 you’ll be fine. Pay close attention to where the needle enters and exits the row: enter between pins 2&3 of Cr2 and exit below the first group of three pins at Cr1.

Weaving R1, with Color 2.
You will now mimic the L1 warping pattern (around three pins on the 1-3 side of the loom and around pin #1 on the 2-4 side of the loom) as you weave this layer. Always enter each row Under and exit Over.
After R1, loop the yarn around 3-pin group on 1-3 side, weave across to 2-4 side. Exit R2 below pin 1 of first full 3-pin group. To begin R3, loop around pin 1 and weave across: U, O.

First three rows of WfL1, Color 2.
Continue WfL1 in the same manner.

WfL1, in progress.
On R16, you will wrap two pins (instead of three) at Cr3. Complete WfL1 by exiting above last three-pin group on 2-4 side of loom, at Cr4. You have 16 rows of color 2.

WfL1, complete.
Step 4–Weft-Layer 2 (WfL2), Color 1
Return to Cr2 where color 1 awaits. If you haven’t already, wind the yarn around the loom 4 1/2 times. Cut; thread needle. Now you will fill in the missing rows.
Weaving pattern for WfL2 now changes to: O, U for each row coming from the 2-4 side. For each row coming from the 1-3 side: U outer loop, then O the first warp strand, U, O . . . (see photos).
R1: Needle enters the space between Cr2’s 3-pin group and first group of three aligned pins–between first two rows of WfL1. Exit row between pins 1 and 2 on 1-3 side (Under last warp strand, Over outer loop). (I’m including two photos, one showing the needle in position and one showing the yarn pulled into place, so you can get a good look at both.)

WfL2, row 1 with needle.

WfL2, row 1; yarn in place.
R2: R2 also goes between R1&2 of WfL1. Insert needle Under the outer loop of WfL1 yarn, between pins 2&3, then Over the first warp strand; exit in the empty space–see photos for explanation. (Notice how WfL2, R1 matches the weaving pattern of WfL1, R2. The yarn follows the path of least resistance, so it scoots up toward that row. Now you have to force WfL2, R2 between those two good buddies. This is where the fork becomes a veritable necessity. Use it to pack lower rows and shove the upper rows out of your way.)

WfL2, R2 goes below WfL1, R2.
Notice in the close-up photo how the needle goes Under the color 2 outer loop and Over the first warp strand.

Needle enters between pins 2 and 3 on 1-3 side; exits in the space between pin groups on 2-4 side.
R3: From 2-4 side, insert needle between pins 2&3; O, U across, exiting between pins 1&2, U warp, O outer loop. Use fork to pack WfL2 row downward and push WfL1 row upward.
R4: From 1-3 side, insert needle U outer loop, between pins 2&3, O first warp; U, O across, ending U. Exit in the space. Use fork to pack TWO WfL1 rows downward on top of the WfL2 row just woven.
Continue weaving WfL2 by skipping two rows of WfL1 (color 2), filling in two rows of color 1 and following the instructions for Rows 3&4. Catching the outer loop with the needle makes a neat selvage edge.
Don’t worry too much about where the needle enters and exits on this layer, just concentrate on filling in. But if you look at the photos you’ll see the row placements are consistent.
Close-up of WfL2, R3.

WfL2, R5. Notice how the houndstooth pattern is visible.
WfL2, R6. Note how the needle goes Under the outer loop and Over the first warp strand.
You may have noticed the different yarn colors in the photos. I did this pattern A LOT! But I kept forgetting to photograph the last stages of the process. So, the last photos are yet another color combination, showing how to finish WfL2.

Nearing the finish line.
R15: Enter O between pins 2&3 of last three-pin group on 2-4 side. Exit between pins 1&2 on 1-3 side (U warp, O outer loop).
R16: Bring yarn around pin #2 (last pin on 1-3 edge), take needle U outer loop that runs sort of diagonally at Cr3, O first warp and weave across, exiting in the empty space.

Close-up of R16 with needle in place
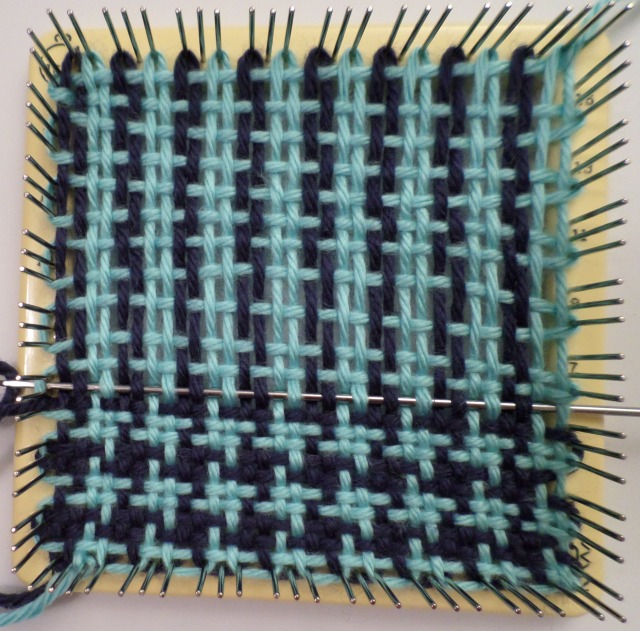
Here’s a look at the finished square still on the loom. Hopefully all your rows line up like this one.

All finished!
Remove the square from the loom by sliding it upward on all sides and popping it off (which is pretty fun). Gently tug on the slip knots at Cr1 to unfasten them.

Front view

Back view
You can use the excess yarn tails to sew this square together with others.
Looks like I’ve got a good start on another blanket . . .

Nine down, how many more to go?
Pingback: Houndstooth Check–Pin Loom Pattern–Part II (for Loomette; also with modifications on my original tutorial) | Windswept Mind
Thank you for this! I’ve just finished my first Houndstooth square and I couldn’t have done it without this post.
Thank you! As always it’s good to hear it’s helped someone. I’ve done that square more than 12 times, but after a year I came back and made another one; I still learned something new.
Thank you for your awesome instructions and photos! I can’t wait to try this! I just bought a Zoom Loom and the book you referenced is only available used — and is crazy expensive online ($89-$124).
Penny, you really don’t need that book. I don’t think there’s an original pattern in the whole thing; there certainly aren’t 100 patterns. Some of the photos are nice for ideas on using color, but I hope my two blogs (see also adventuresinpinloomweaving.com) will inspire you that way. I’m pretty sure all of the 100 pin loom squares patterns are available on eloomanation.com. I’ve written up a number of them on adventures in pin loom weaving as well. Glad this post helped you!