8 June 2018 UPDATE
It looks like we’re reviving this Book Weave-along for the 2018 summer season, so it’s necessary for me to add some preliminary information.
SUPPLIES:
- Loom, weaving needle … (the basics)
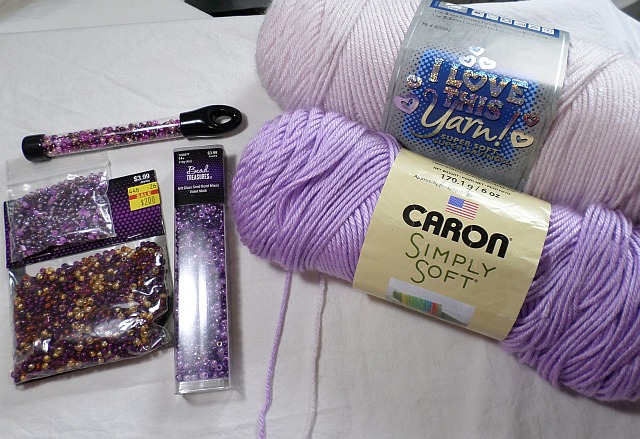
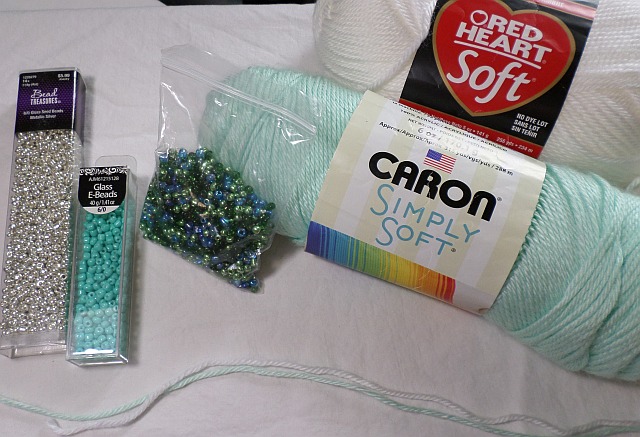
- Two coordinating colors of yarn; see photos below (For L1-3 you want yarn that’s thin enough to accommodate beads; for L4 you’ll want a yarn thick enough to close the weaving up so you don’t see the stiffener between the covers. I don’t usually recommend I Love This Yarn, so I must have been using it ONLY for L4, the weaving layer, to tighten up the weave. IN general, when using two colors you’ll want a higher contrast between the two, but for this project you need colors similar in value to each other so they’ll contrast with the beads. Variegated yarn is not recommended for the beaded square.
- E beads (AKA rocaille beads or 6/0 size seed beads) with a large center hole; you need at least 40. They MUST contrast with your yarn, i.e. clear beads won’t show up unless they’re foil lined; opaque beads may show up better on darker yarn.
- Something to thread the beads onto the yarn (like dental “floss threaders” or very thin wire)
- Puffy or Fun Foam or plastic canvas or even cardboard to stiffen your covers. (Not crucial at this point; it will be discussed in The Final Finish post.)
- Two small binder rings (you can certainly use larger ones; the penny shows approximate ring size)
- hole punch—for the pages (I think mine makes a 1/8″ hole)

foam, plastic canvas, floss threaders, hole punch, binder rings

These photos show sample color schemes for the Book Weave-along. The beads that come in round tubes with the black plastic hanger were purchased at JoAnn Fabrics. Though the beads are pretty, the holes are too small to thread onto worsted acrylic yarn. (They work on wool which is stretchier.) I bought the other beads at Hobby Lobby and WalMart; some are from my stash.
STEP ONE:
Weave one plain weave square. This square will end up as the inside of either the front or back cover (your choice).
STEP TWO:
The post below contains information for proceeding with Step 2—the two-color plain weave square. This square will be used as the inside of either the front or back cover.
******************************************************
Using two colors . . .
This demonstration will show L1-3 in main color (MC) and L4 in contrast color (CC). I’ll start with the simpler method.
METHOD ONE—Simple Color Change
First, decide which yarns to use for your main color and contrast color. I like to warp the loom with a thinner yarn and weave with a slightly thicker yarn. In the photo below, the pale purple and white are the thicker, CC yarns. I’ll warp two looms—one with lilac and the other with soft green—then weave with pale purple and white, respectively.

Thinner yarns are top and bottom; thicker yarns in the middle.
Warp the loom, L1-3, with your MC. You can secure the beginning yarn tail using your method of choice or, as I’ve done, just leave it hanging loose. (I didn’t think to leave about a yard for the beginning tail which could have been used to sew the pieces together later on, so you might want to do that. Just tie it up in a butterfly bundle.)

L1-3 in MC
Next, tie the end of the MC tail to the loom somewhere out of the way of your weaving. (You could leave it hanging, but for beginners that can be a bit frustrating.) Then tie your CC tail to one of the lower pin edges (again, you could also leave this tail hanging), wrap the yarn 4.75 times around the pins, cut it, thread your needle and begin weaving. It’s as easy as that. (Some may prefer to tie a magic knot or weaver’s knot or do a Russian join here. I don’t like knots or the Russian join, especially with acrylic yarn, so I don’t use them.)

MC tail is wrapped under the loom and tied to one of the 2-4 side pins. CC tail is tied to one of the 1-2 side pins.
If you left your beginning tail hanging, as you weave you might notice the first warp seems to disappear. Gently tug it back into place by pulling the beginning tail downward (away from Cr1).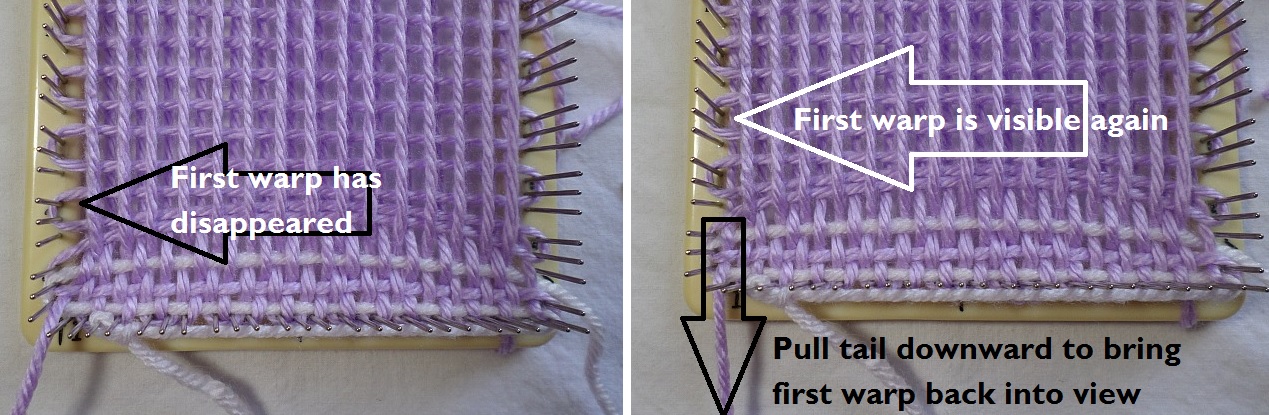
As you continue weaving, you may need to move the yarn tails out of the way. Here, I’ve moved the MC end tail to the 1-2 side of the loom to get it out of the way of my weaving.

MC end tail has been moved from 2-4 side to 1-2 side of loom
WEAVING TIP: As you weave, you may notice the outer warps start to draw in toward the center. Use your fork to push them back into place. In fact, use your fork throughout the weaving process to keep your weaving looking even.

Use your fork to push the strands around
When finished, you’ll have four loose ends to do with as you choose. Since we’re planning to make a book, these ends can be safely stowed on the back of the square.

Finished—on and off the loom. Note even distribution of strands from top to bottom and side to side.
METHOD 2—Working in Ends As You Go
This method is rather complicated. I developed it over the course of weaving MANY squares and I do it out of habit now, so it does get easier. I use it chiefly to avoid dealing with ends later on. I like to work in ends along the whole length of the row instead of just a few stitches in. In my opinion, on such a small piece of work, aberrations are more apparent, so I like to make the ends look like part of the design.
(Apologies if the photos are hard to see; it was a cloudy day and the sunlight kept fading in and out.)
To begin: tie a reverse slip knot (one that lets you manipulate the knot from the cut end rather than the attached-to-the-skein end) and loop it loosely over a pin beyond Cr3 on the 3-4 loom side—it doesn’t matter which pin. Bring the yarn down to Cr1 outside the pins and loosely wrap it as shown in the photo.

Wrap to the right of Cr1 pin
Next, wrap the yarn clockwise around the Cr1 pin and bring it in place to begin warping. At the same time, you’ll remove your slip knot from the top of the loom. However, keep the knot and length of yarn intact—you’ll return the slip knot to its place after L3 is warped. Keep it all a bit loose—especially if using acrylic yarn. (This pin wrap will be undone later on; for now it exists to allow warp 1 to be in its correct place.)

Keep the outside tail long, wrap the first pin, and begin warping L1.
Continue warping through L3. Replace the first slip knot near Cr3 and tie a second slip knot at the other cut end. Attach the new loop anywhere along the 3-4 side; bring this one snug to the pin, but leave the first one loose.
Attach CC to lower edge of loom near Cr1 with a large-ish, loose slip knot. (We want a tail long enough to work in across R1 later on.) Wrap yarn around the pins 4.75 times, cut, thread needle and be ready to weave.
Now we get really tricky. The photo below shows at left, a close-up of the needle exiting R1; at right, a close-up of the needle entering R1. The center shows R1. (CC slip knot has been temporarily removed from the loom for photographing purposes. Don’t take yours off).

To enter R1: take the needle and pull the outer Cr2 loop outward, then scoop up the L3 tail and warp #31 as though they were one strand. You are going UNDER the first warp of R1—these two threads count as one.
Continue weaving Over and Under across the row.
At CR1, take the needle Under warp #1 but through the loop at Cr1 pin. This is the only time you’ll treat these two as separate threads. From now on, the beginning tail and warp 1 are counted as one warp.
Continue weaving for a few rows. Begin each row by pulling the outer loop away from the pins and scooping up the tail and first warp together—going Under it. Exit each row going Under both the last warp and the tail. BE VERY CAREFUL not to split the tail yarn with your needle.

Close-up of needle pulling L2 loop outward and scooping Under tail along with first warp.
As soon as you’ve done at least two rows, you’ll work in the beginning CC tail in this way:
- Untie slip knot at the cut end of CC tail.

- Take needle Under the clump of yarn at CR2. (Clump = outer loop + tail + warp 31.)

- Weave needle Over and Under, exactly mimicking R1 yarn path. Exit R1 through the loop at Cr1.

- With blunt instrument (I use the eye of the needle), lift the loop off the pin at Cr1. BE CAREFUL NOT TO LIFT ANYTHING ELSE OFF THE LOOM!

- Remove the needle from the freed loop. Remove slip knot looped up near Cr3 and pull the beginning yarn tail up toward Cr3, snugging the cut end of the CC yarn tail in the tightened tail/warp loop. (If you split the tail yarn with your needle, the tail will not slide easily and the noose won’t tighten. Work it tight as best you can; you may want to unweave a row or two if it will allow you to pull the tail tight. However, I often forget to work in the CC tail till the very end of the square; and I’ve usually split the tail yarn with the needle somewhere along the line. In that case, I take the eye of the needle and tighten the noose part of the tail/warp, then distribute the rest of the fullness along the outer edge.)

Pull beginning tail up toward Cr3.

Close-up of CC tail in tightened Cr1 “noose.”
- Replace the beginning tail slip knot beyond Cr3 and tighten it snugly against the pin.


Continue weaving the square. When you get to Cr3, though it looks a bit different, you’ll still begin and end the row in the same way—pull the outer loop away from the loom, scoop Under tail and warp, weave; exit row Under last warp and tail.

R16 with needle in place
Pull the needle through, turn it around and go back through the row to work the CC tail in. This time, we’ll enter the row between the tail and warp #31 (Over the tail and Under the warp).

Close-up of needle working in ending tail.
Left-: Re-entering R16—Over tail, Under first warp.
Right: Exiting R16—go Under last warp, then through the center clump of yarn there.
When finished, you’ll have four ends already worked in. Depending on your project, you can cut those ends off close to the square or, since we’re making a book and don’t want cut yarn sprouting at the corners, you can still secure them at the back of the square, inside the book cover. Steps one and two complete for two different books.
******************************************************
In the next post we’ll work on two-color weaving again using the “Double Outline Diamond” from the Weave-It Weaves booklet, p 20-21. Please note: you can still learn the pattern and make the book using only one color and/or omitting the beads, but I heartily recommend trying all the techniques.
******************************************************
Here are the blog posts in order (the first is a link to the post you’re now reading):
[Those in the Facebook Pin Loom Weaving Support Group can link to all the info regarding the Book WAL by clicking this Book WAL link, but that’s not necessary because I’ve included it all here.]